The room is starting to fill up at the Taj Mahal Hotel in Hyderabad. There’s a sense of anticipation on everyone’s faces, gathered to learn a new life lesson that could save lives in an emergency – Cardiopulmonary Resuscitation (CPR).
Bhavishya and Ravindra, a couple, arrived early at the seminar hall. They travelled from Rajamahendravaram in Andhra Pradesh, leaving their two-year-old child with grandparents. They took a flight to Hyderabad, setting aside their work for the day to be here.
Interestingly, despite living just a few kilometres away, the local Hyderabadis are running a bit late.
The session focused on essential life-saving techniques: Cardiopulmonary Resuscitation (CPR), first aid for seizures, first aid for choking, and a demonstration of the Automated External Defibrillator (AED).
“Ever since Covid-19, I’ve seen so many cases of heart attacks in the news. My grandfather suffered a heart attack, and I realised that if any of us in the family had known CPR, it could have made a difference. That’s why we’re here—to learn this vital technique that can save lives in critical moments,” Bhavishya, a lawyer, told South First.
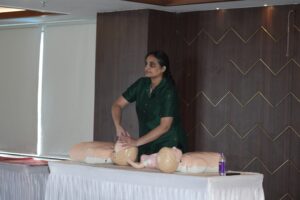
Hyderabad-based paediatrician Dr. Sivaranjani Santosh led the session. She has been conducting such programmes for some time. She focused particularly on paediatric CPR and first aid for choking, crucial for dealing with emergencies involving infants.
“I have a two-year-old child, and it’s one of the main reasons I joined this session,” Bhavishya added.
Participants looked eager to learn something new—a lesson like the ones taught in a school science lab. However, this time, the lessons could come in handy in their lives.
Joining Dr Sivaranajani at the training session in Hyderabad on Wednesday, 16 October, were Dr. Chandrasekhar, Dr. Uday Kiran, Dr. Anusha, Dr. Vignatha, and Aditi Santosh, all committed to sharing their knowledge and expertise in life-saving techniques.
Aatish Naidu, 17, came with his self-made booklet on first aid. “I’ve known Dr. Sivaranjani for a while—I’ve attended some of her sessions. For me, health awareness is really important, and I wanted to contribute in some way,” Aatish said. “I decided to create a booklet on CPR, first-aid, and general health tips to help spread the word.”
“My parents supported me, and we printed around 1,000 to 1,200 copies. It feels really good to create something of my own. People are appreciating my idea and the initiative, which motivates me to do more and influence others,” he added.
Also Read: QR code-based CPR training at traffic signals in Bengaluru
‘Hello, can you hear me?’
The participants looked excited, ready to dive into the experience the session was offering.
The session was slow initially, with hundreds of participants chatting and waiting for their turn. Some of them were attending for the third time, to stay refreshed and keep their skills sharp.
In the room, there were seven mannequins—three infants, three adults, and one representing an older child.
Step 1: Check for responsiveness
To check if a person is conscious, tap her/him gently on the shoulder, and say clear and loud, “Hello, can you hear me?” If it’s an adult, s/he might wake up; a baby might cry. When checking a baby’s consciousness, it’s better to tap on the foot or hand while saying, “Hello.”
Step 2: Check for breathing
Dr. Sivaranjani Santosh showed how to check breath.
If the person is unresponsive, check for breathing. Tilt her/his head back slightly and look inside the mouth to ensure that nothing is blocking the airway. Remember, never blindly put your fingers in their mouth.
Use the “Look, Listen, and Feel” method:
- Look to see if the chest is rising and falling.
- Listen for any breathing sounds.
- Feel their breath.
If they are not breathing, begin CPR.
Step 3: Start CPR

- Lay the person on their back on a firm, flat surface.
- Kneel beside their chest.
- Place the heel of one hand on the centre of the person’s chest and place your other hand on top, interlocking your fingers.
- Keep your elbows straight and position your shoulders directly above your hands.
- Push hard and fast at a rate of 100-120 compressions per minute, allowing the chest to fully recoil between compressions.
- Push to a depth of about two inches for adults, loudly counting, one and, two and, three and, four and… up to 30 compressions.
Step 4: Open the airway, give rescue breaths

- After 30 compressions, open the person’s airway using the head-tilt, chin-lift technique.
- Pinch her/his nose shut, take a normal breath, and cover their mouth with yours to create an airtight seal.
- Give two rescue breaths, each lasting about one second, watching for the chest to rise.
For a child, use only one hand for compressions and do not pinch the nose when giving breaths.
Repeat the cycle
Continue the cycle of 30 chest compressions and two rescue breaths until emergency help arrives or the person shows signs of life. Always look at the chest while giving breaths so that you can check for chest movement.
Dr. Sivaranjani shared a humorous observation about how CPR is often misrepresented in movies: “In movies like Sivaji: The Boss, Dr Chezhian played by Raghuvaran was shown looking at the eyes while giving CPR. But he should have looked at the chest.
In Mithun Chakraborty’s Luck, a character’s heart is on the right side of the chest! Since the heart is normally on the left side (barring cases of dextrocardia), CPR should always be performed in the centre of the chest. Movies often portray actors pressing the stomachs of drowning victims, which is wrong. It can choke the person.
“If I ever make a movie, I’ll make sure we get these details right,” she said.
Dr. Sivaranjani emphasised that the same CPR technique should be used for a drowning victim as well.
Also Read: Union Health Minister launches nationwide awareness programme on CPR
Choking
The session continued for choking.

Universal sign for choking
- Recognise the signs
- The universal sign of choking is when a person clutches their throat with one or both hands.
- If they can still cough, encourage them to continue coughing to try to dislodge the object.
2. Perform Back Blows
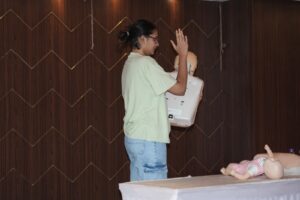
Use the heel of your hand to deliver 5 strong back blows between the shoulder blades.
- Stand to the side and slightly behind the person.
- Use the heel of your hand to deliver five strong back blows between the shoulder blades.
- Tilt the person slightly forward while giving these blows. For infants and toddlers, keep the hands between the legs, hold the chin, slightly tilt, and give the back blows.
- If the foreign object is expelled, stop the procedure. If not, proceed to the next step.
3. Perform abdominal thrusts (Heimlich maneuver)
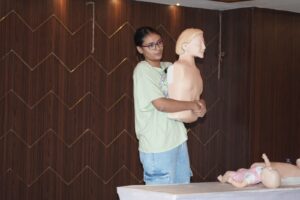
Abdominal thrusts
- Stand behind the person and wrap your arms around their waist.
- Find the tip of the breastbone (sternum) and measure a three-finger gap down to locate the right spot.
- Place your fist slightly above the belly button, with your thumb side in.
- Grasp your fist with your other hand and perform quick, upward thrusts.
- Repeat the thrusts up to five times.
4. Repeat the cycle
- Alternate between five back blows and as many abdominal thrusts if the blockage is not cleared.
- Perform up to three cycles, if necessary.
5. Call emergency services
- If the obstruction is not cleared after three cycles, call an ambulance immediately.
- Continue administering back blows and abdominal thrusts until help arrives or the person can breathe again.
If the person becomes unconscious, lay her/him down and begin CPR if necessary. If you are dealing with a pregnant woman, abdominal thrusts are a strict no.
Also Read: Doctors react to cases of sudden cardiac arrest in teens
Using Automated External Defibrillator (AED)
An Automated External Defibrillator (AED) is a portable device used to diagnose and treat life-threatening cardiac arrhythmias by delivering an electric shock to restore normal heart rhythm.
“An AED is not a replacement for CPR but an additional tool that can help in life-threatening situations. There are two types of heart rhythms: Shockable rhythms and non-shockable rhythms,” Dr Arshiya explained.
“The AED will automatically detect the type of rhythm present. CPR should not be stopped when using an AED, except when the AED instructs you to do so,” she added.
AED: Steps
1. Remember, the AED provides external help to analyse the heart rhythm and deliver shocks if necessary, but it doesn’t replace the need for CPR.
2. Turn on the AED
- Turn on the AED as soon as it is available. Follow the device’s voice prompts and instructions.
3. Attach electrode pads

Electrode pads
- Apply the electrode pads to the person’s bare chest as directed by the diagrams on the pads.
- Ensure that no one is touching the person while the AED analyses the heart rhythm.
4. Analysing the rhythm
- The AED will analyse the person’s heart rhythm. This step is automatic, and the device will decide whether a shock is needed.
- If a shockable rhythm is detected, the AED will instruct you to deliver a shock. If a non-shockable rhythm is detected, it will guide you to continue CPR.
5. Deliver shock (if advised)

- If the AED advises a shock, make sure everyone is clear of the person.
- Press the shock button when prompted by the AED.
6. Continue CPR
Do not stop CPR even after delivering a shock unless the AED instructs you to do so or until emergency responders arrive.
- Continue the cycle of chest compressions and rescue breaths as needed.
(Edited by Majnu Babu).